Setup Guide: NES HDMI Bundles
This guide covers any of my NES bundles that come with an HDMI converter: hooking it up to a modern TV, power, loading cartridges, the controllers, and the flash cart if your bundle has one. Everything in your bundle was tested together before it shipped. Your listing’s packing list is the final word on exactly what’s in your box.
What’s in the box
Every one of these bundles includes:
- A restored NES front-loader
- At least one original Nintendo controller
- At least one game, ready to play
- A composite-to-SCART cable
- A powered SCART-to-HDMI converter
- A power adapter for the console and one for the converter
Some bundles also include an HDMI cable, a second controller or a flash cart. You’ll need a free HDMI port on your TV and two power outlets.
Connecting to your TV
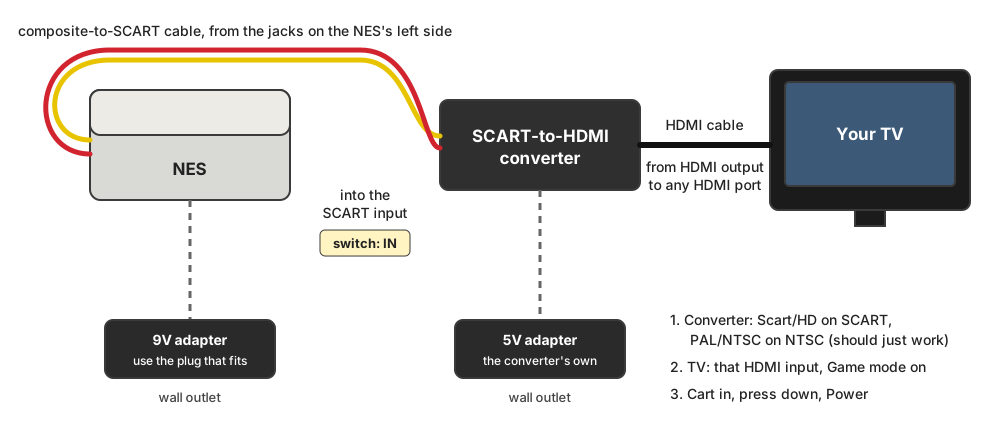
- Plug the composite-to-SCART cable into the NES Video and Audio jacks on the left side of the console (as you face the front).
- Check the little IN/OUT switch on the SCART plug is set to IN (the signal is going into the converter), then plug the SCART end into the SCART input on the converter.
- Connect an HDMI cable from the converter’s HDMI output to your TV.
- Plug the converter’s power adapter into the converter and the wall. The converter needs its own power to do the upscaling.
- The converter should just work. It has three buttons on the front, and if you ever get no picture: press Scart/HD to select the SCART input, press PAL/NTSC to pick NTSC, and use 720P/1080P to try both output resolutions and keep the one your TV likes best.
- Set your TV to the matching HDMI input, and turn on its Game mode if it has one, to keep the lag down.
Black screen or a rolling picture? Nine times out of ten it’s a converter setting. Recheck step 5, then the IN/OUT switch on the SCART plug (if IN gives you nothing, try OUT), then that the plug is pushed all the way in.
The same converter will upscale other consoles too, if you add the right cable for them later.
Power
Use the included 9V DC power adapter for the console. If it has two plugs, that’s because it can also power a Super NES; only one of them fits the NES. The NES power circuit runs happily on this modern DC input, no modification is made to the console, and it stays fully compatible with an original Nintendo AC adapter if you ever prefer one. I scope-check every batch and model of adapter I include for clean, steady output.
Loading cartridges
Your NES’s 72-pin connector is cleaned, serviced and tested (I keep the original Nintendo part whenever it can be saved, which is almost always). It loads the normal way:
- Open the door and slide the cartridge in, label up, all the way back.
- Press it down until it latches.
- Close the door and press Power.
About the blinking light, and garbled screens. The 10NES lockout chip in your console is disabled (socketed with pin 4 lifted; it’s reversible, and the original chip stays in the console). That means a cart with slightly dirty contacts is more likely to just work, instead of sending the console into the famous blinking-light reset loop.
The tradeoff: when a cart isn’t making good contact, you’ll see a garbled screen (scrambled graphics, a grey or solid-color screen, or noise) instead of the blinking light. That’s normal. It’s just the new way of saying “reseat the cart,” not a sign anything is wrong with the console. Power off, pop the cart up, reseat it and try again. If it keeps happening with one game, clean that cart’s contacts with isopropyl alcohol on a cotton swab. Please don’t blow in the cartridges.
Light-gun games (Duck Hunt, Hogan’s Alley, Wild Gunman) need a Zapper and a CRT television. The Zapper relies on timing that modern TVs and converters break, so they won’t work through this setup.
Controllers
Plug a controller into port 1 on the front of the console for one-player games; a second controller goes in port 2. Both ports are tested.
If your bundle has a flash cart
Your flash cart comes with a microSD card and no games. I don’t preload or sell copyrighted games, and bundling a cart doesn’t change that. What goes on it is up to you. To load it:
- Pop the microSD card out of the side of the cart and put it in your computer (a cheap USB microSD reader works if your computer has no slot).
- Get the games yourself: homebrew (plenty is free, and new NES games are still being released), and backups of cartridges you own.
- Copy the game files onto the card, put it back in the cart, and insert the cart like any other game.
Don’t install official EverDrive firmware updates. The cart is a clone running unofficial firmware, and an official update can brick it.
A good first load: two free, open-source test programs from the NES homebrew
scene. Allpads shows every button press on each controller live, so you
can see for yourself that both pads register perfectly. The
240p Test Suite is the standard set of picture tests retro video folks use
to check sharpness, color and lag. Grab the .nes file from each page and copy it
to the card.
New to this? Message me and I’ll point you at more free homebrew to start with.
Questions
If anything is unclear or you hit a snag, reach out. I’m glad to help you get it running.